|
Fix for a loose connection in the connector of the Tomtom Urban Rider active
docking shoe
Reparatur des oft auftretenden Wackelkontakts im Stecker der aktiven
Ladehalterung für den Tomtom Urban Rider |
|
Impressum: (click link) |
(Updated 11/2019) |
the English translations in below the picture
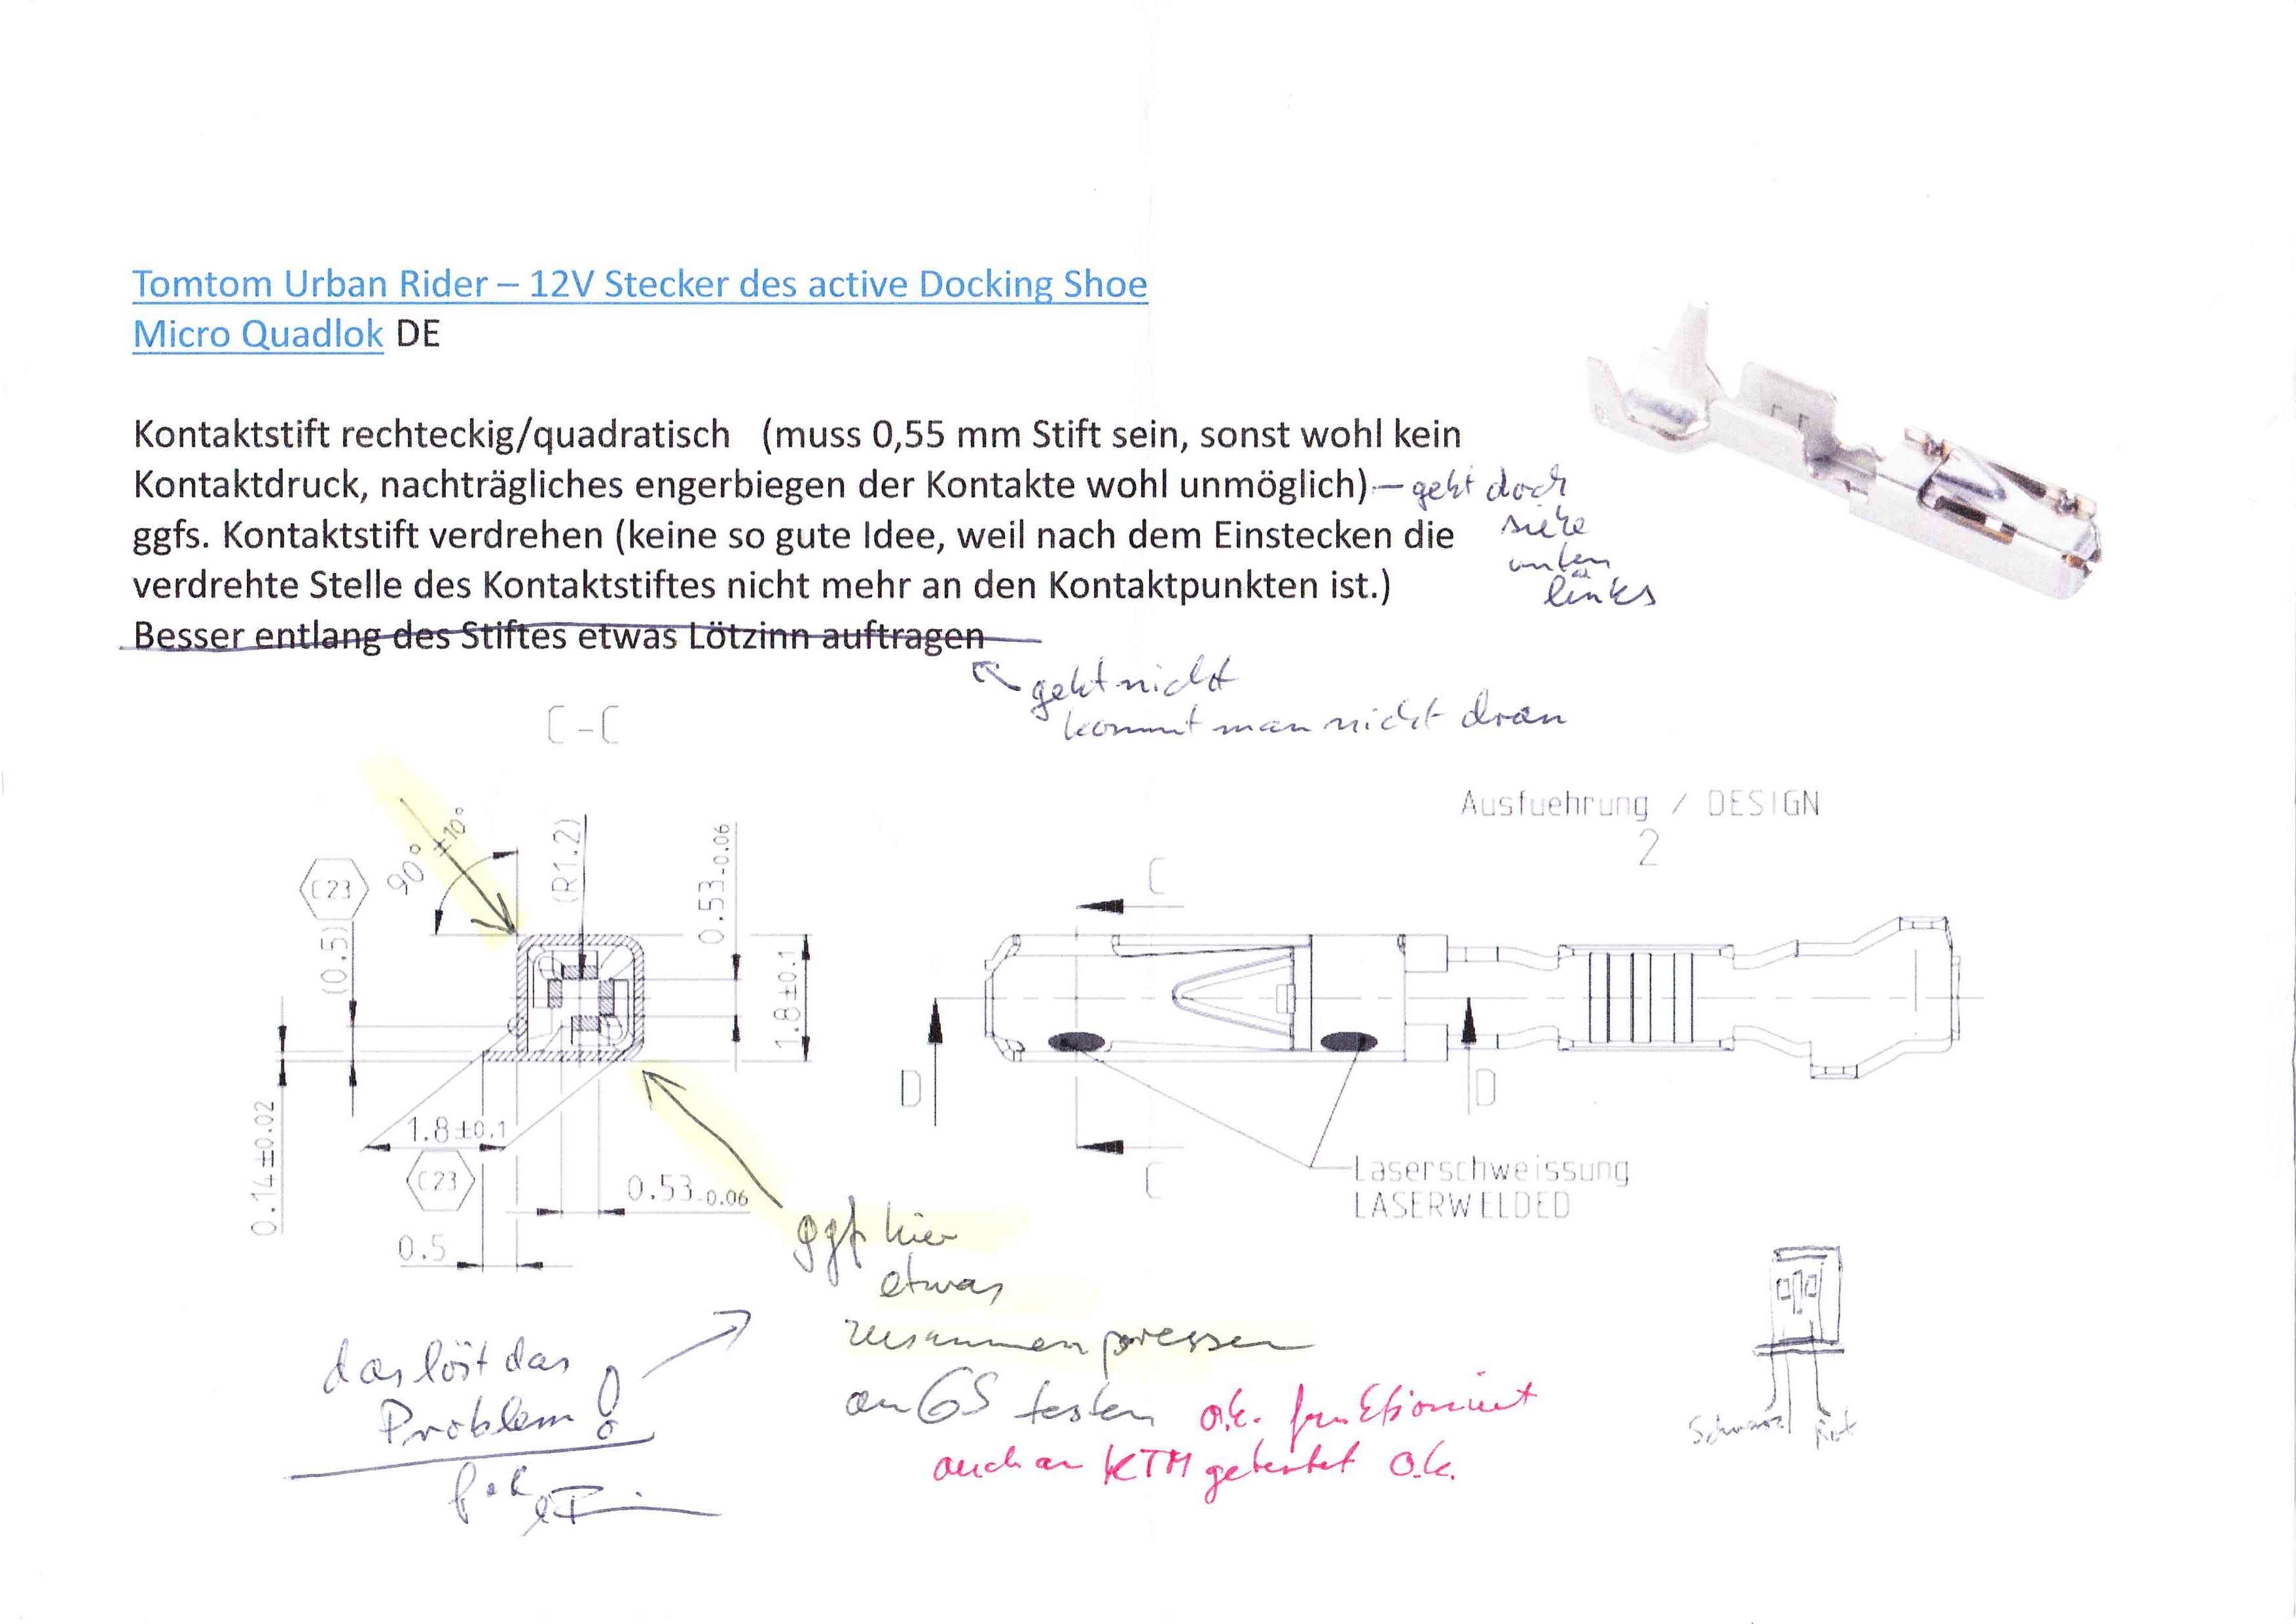
Das Problem mit dem Wackelkontakt in dem Stecker der aktiven Ladehalterung kann man näher eingrenzen indem man den Stecker etwas rein und rausschiebt (dazu die Entriegelung unten betätigen). Wenn sich dabei zeigt, dass der Tomtom Urban Rider in machen Positionen geladen wird, dann kann das an einem Wackelkontakt (verursacht durch eine schlechte Konstruktion der Stifte und Kontaktfedern) in dem Stecker kommen. Um dieses Problem zu beheben muß man den Kontaktfedern in der Buchse der Steckverbindung etwas mehr Andruck geben. Dazu muß man beiden Buchsen ausbauen und seitlich mit einer kleinen Zange an der gelb markierten Stelle zusammendrücken.. 1-2 Zehntel mm. Die im Querschnitt quadratischen Buchsen sehen dann etwas Rautenförmig aus. Zu viel zusammendrücken ist schlecht, da man dann die Buchsen nicht wieder in den Plastikkörper stecken kann. Das ist nichts für Grobmotoriker ! Ich hab dafür eine kleine Knipex 86 03 150 Zange benutzt. Damit ging das sehr kontrolliert.
Die Buchsen (auf dem Bild unten) stecken in dem am Kabel befindlichen Teil der Steckerverbindung. Zum Ausbau muss man zuerst auf der Kabelseite eine Verriegelungsnase mit einem sehr kleinen Schlitzschraubenzieher entriegeln. Dann das Kabel nach vorne schieben. Dann den Außenteil des Steckers (grünes Plastikteil) seitlich von dem inneren Buchsenhalter herunterklipsen. Dann die Verriegelungsnasen der zwei Buchsen drücken und am Kabel die einzelnen Buchsen nach vorne rausschieben. Dabei wird auch die Gummidichtung die an der Buchse ist sichtbar. Dann wie oben beschrieben die quadratischen Stecker von außen diagonal verformen (siehe Bild). Hier auch die Richung beachten. Wie man sehen kann wird nicht von der Seite gedrückt an der die Blechnase ist !
Zusammenbau: Buchsen am Kabel wieder in das Gehäuse ziehen und prüfen, dass die Blechnasen eingerastet sind . Grüne U-förmige Plastikkappe wieder seitlich aufklipsen. Stecker in das Außengehäuse ziehen. Darauf achten das es einklipst. Fertig. Problem gelöst... keine Ablenkung mehr durch rumwackeln am Stecker während der Fahr.
Die intensive Suche nach einer Lösung für dieses Problem, daß ich schon ewig hatte, wurde durch einen Beinahe Auffahrunfall motiviert. Ich bemerkte kurz nach dem Losfahren, daß der Stecker mal wieder ein Wackelkontakt hatte und nicht geladen wurde. Ich wackele am Stecker, schau auf das Ladesymbol auf dem Display und Schreck! da steht doch plötzlich vor mir so ein blöder Kleinlaster. Notbremsung, Ausweichen... Adrenalin... das war knapp... das mußte nun wirklich nicht sein. Grund: Hab mich durch diesen Wackelkontakt ablenken lassen... selber Schuld... aber die technische Ursache wollte ich jetzt wirklich mal beseitigen.
look at my scibbles / schaut Euch die Notizen an
The problem with the loose contact in the plug of the active charging shoe
can be narrowed down by pushing the plug in and out a bit (press the release
button below). If it turns out that the Tomtom Urban Rider is charging in some
positions, then this may be due to a loose connection (caused by poor
construction of the pins and contact springs) in the connector. To correct this
problem you have to give the contact springs in the socket of the connector a
little more pressure. To do this, you have to remove two female connectors and
squeeze them sideways with small pliers at the yellow marked point (see pic).
Probably 1 or 2 tenths of a mm is sufficient. The square in cross-section of the
female connector then look a bit diamond-shaped. Squeezing too much is bad,
because then you can not put the female connector back in the plastic body. This
is
not for
those with two
left hands! I used a small Knipex 86 03
150 pliers. This was very controlled.
The sockets (on the picture below) are
in the part of the plug connection located on the cable. To remove one must
first unlock on the cable side a locking lug with a very small slotted
screwdriver. Then push the cable forward. Then clip the outer part of the plug
(green plastic part) sideways from the inner socket holder. Then press the
locking lugs of the two sockets and push out the individual sockets on the cable
to the front. The rubber seal on the bush becomes visible. Then, as described
above, deform the square plugs diagonally from the outside (see picture). Also
note the direction here. As you can see is not pressed from the side where the
sheet metal edge is sticking out!
Assembly: Pull the sockets on the cable
back into the housing and check that the metal tabs are engaged. Clip the green
U-shaped plastic cap back on sideways. Pull the plug into the outer housing. Be
sure to clip it in. Finished. Problem solved ... no more distraction by loose
connection on the plug while driving.
The intense search for a solution to
this problem, that I have had for ages, was motivated by a near-collision
accident. I noticed shortly after starting my ride that the plug again had a
loose connection and was not loading my Tomtom Urban Rider. I wiggled the plug,
looking at the charging symbol on the display and fright! there's suddenly such
a stupid pickup truck in front of me. Emergency braking, dodging ... adrenaline
... that was close ... that really did not have to happen.
Reason: I was
distracted by this loose connection ... I have to blame myself ... but now I
really wanted to eliminate the technical cause.